¶ Introduction
You can add items into the world and manipulate them with Script Extender or by adding level data files into your mod structure. This guide will focus on adding via Data Files, but we’ll still need Script Extender to gather this data.
Things you’ll need to get started:
- Norbyte’s Script Extender with Console Enabled
- The MapKey of the item you are looking to add into the world
- Some note taking app, to copy and paste things to and from
- Patience
Using Script Extender to get positional information does not create a dependency on it for your mod, you’re simply using it to capture data points.
¶ Capturing Data with Script Extender
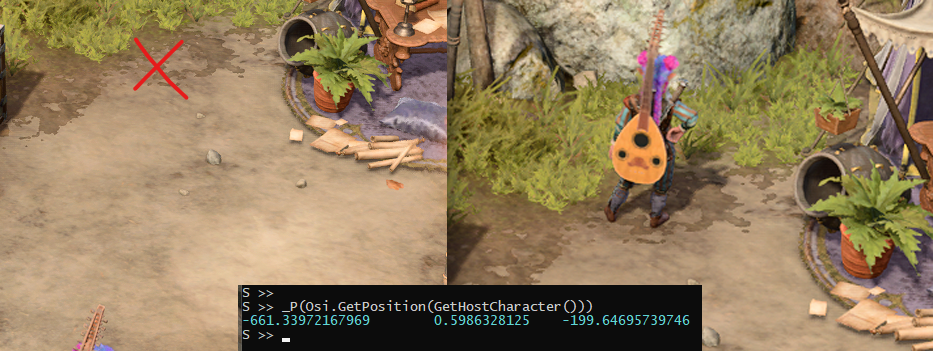
Once you’ve booted into BG3, head to the area where you want to insert the item.
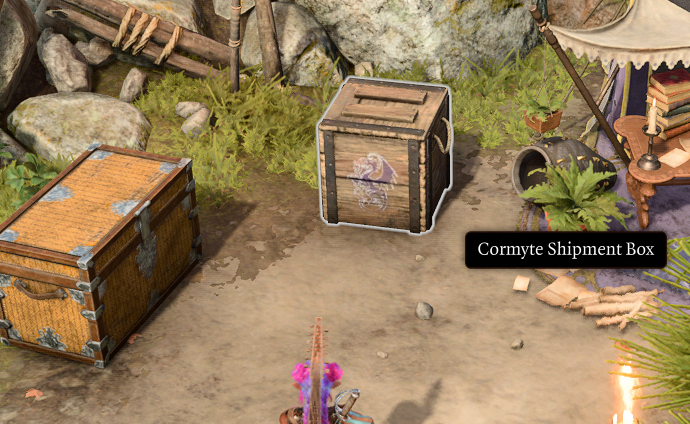
If you haven’t done so yet, go get the MapKey of your item. For this demonstration, I’m going to use “Cormyte Shipment Box” which has a MapKey value of: “3a6bf1fb-2785-406a-85d4-6bd247714591”
¶ Position
Once you’re in position, bring up Script Extender’s console and press Enter. This should give you a message that says “Entering server Lua console.” You should be set to enter commands now.
The first command you want to run is: _P(Osi.GetRegion(GetHostCharacter()))
This should print the region that you are in, for example: WLD_Main_A would be returned if you were in the main camp for Act 1. Save this somewhere, it will be the same name of the Level’s data file you’ll be adding to.
The next command to run is: _P(Osi.GetPosition(GetHostCharacter()))
This will return an X, Y, and Z coordinate (in that order), for the position your character is standing. Example: -661.3397, 0.5986, -199.6469. Be sure to also save this somewhere.
Note, the coordinates will not have any commas between them, only a single space.
However, when you enter them later into Script Extender, you will put commas between them.
¶ Spawn Item
Next we’ll go ahead and add a copy of the item into the game to see how it looks.
To do so, let’s take a look at the command we’ll use and what the parameters do.
Osi.CreateAt(templateId, x, y, z, temporary, playSpawn, spawnFinishEvent)
It’s not as scary as it looks, it breaks down like this:
templateIdis the MapKey we looked up earlier. By adding it here, we’re saying to create an item using this MapKey as a template. It doesn’t add the original to the map, we’re creating a copy based on the original.xis the X coordinate (the first number that was returned from the GetPosition command.)yis the Y coordinate (the 2nd number)zis the Z coordinate (the 3rd number)temporarythis determines whether or not the generated item is temporary or permanent (0 for permanent)playSpawn[someone smart can answer this], just set it to 1spawnFinishEvent, you can leave this blank “”
When you use the command, it returns a GUIDSTRING for the newly created object. Rather than referring back to this string each time, we’ll just set it to a variable. I used newbox, but you can set it to whatever fits your scenario.
When you put that all together, it looks like this:
newbox = Osi.CreateAt("3a6bf1fb-2785-406a-85d4-6bd247714591", -661.3397, 0.5986, -199.6469, 0, 1, "")
Move your character out of the way, if you didn’t already, before spawning an item into that spot.
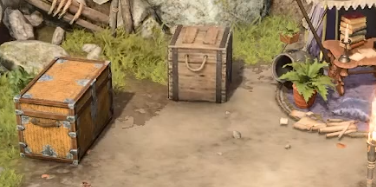
¶ Rotation
Next you’ll need to know what angle to rotate the item, so that it looks right.
We’ll refer back to the variable assigned to our item, in my case newbox and we’ll use this command with it:
Osi.ItemRotateYToAngle(item, angleDeg, speedDegPerSec)
As hinted in the name, we’re rotating the item along the Y axis TO a specific angle. We are not rotating BY that angle. That’s an important distinction. This means if you issue the command with 90 degrees as the parameter, and then issue the command with 90 degrees again, it doesn’t rotate an additional 90 degrees from the new position, but rather 90 degrees from the default position.
itemThe item we’re rotating, in this case newboxangleDegThis is the angle (in degrees) that we’re going to rotate the item.speedDegPerSecThis is how fast the item rotates, entered in degrees per second.
We can use this command to rotate the item until it’s just right.
Example: Osi.ItemRotateYToAngle(newbox, 90, 90)
¶ Fixing Positions
If you decide the item doesn’t look like it’s in the right position, you can either move it to a new position or delete it and recreate it. It’s about the same amount of work for both methods.
¶ Delete
This command is: Osi.RequestDelete(item), for our example item = newbox so it’s Osi.RequestDelete(newbox).
Then get the new coords and recreate it like you did above ^
¶ Move
This command is: Osi.ItemMoveToPosition(item, x, y, z, speed, acceleration, event)
Mostly the same parameters as before, speed being how quickly it moves and acceleration on or off (meaning 1 or 0).
So in our case you could do: Osi.ItemMoveToPosition(newbox, 640, 0.6, -200, 30, 1, ""
¶ Data Files
Now that we have our positional data, we get to insert it into the level’s data file.
¶ Levels
If you’ve ever unpacked Gustav.pak you might find one of the directories called “Levels”, you can think of levels as maps. Each map has subdirectories with lsf files inside. These files represent different game objects (Characters, Items, etc) and their placement in the level.
We’ll be focusing on the _merged.lsf file within the Items subdirectory.
The version of this file in your mod does not need to be called
_merged.lsf, it can be called whatever you like.
Example of WLD_Main_A subdirectories:
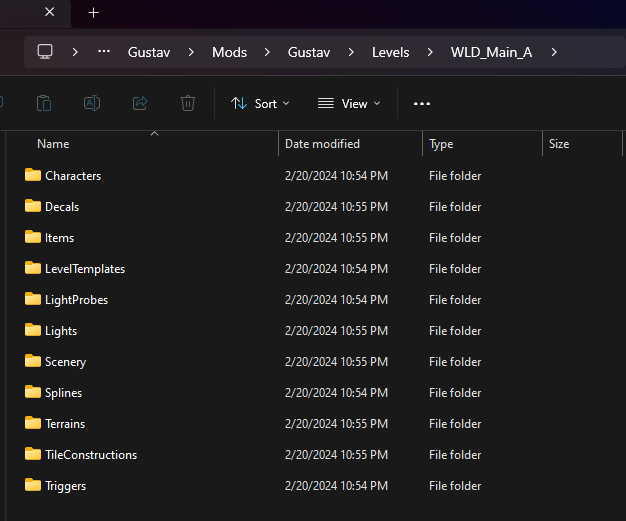
From your mod’s workspace, you’ll need to mirror the directory structure, down to the lsf file.
- MySweetMod
- Mods
- MySweetMod
- Levels
- LevelName
- Items
_merged.lsf
- Items
- LevelName
- Levels
- MySweetMod
- Mods
If you’re using the bg3-modders-multitool (you should be) you can add
lsf.lsxas the extension and it will auto convert from lsx (editable version) to lsf (binary, non-editable) when you pack your mod.
Example:_merged.lsf.lsx
¶ Item Data File
Refer back to the region you returned earlier. That is the directory you’ll need to create.
Example of the _merged.lsf.lsx data file that would be in this directory
<!-- MySweetMod\Mods\MySweetMod\Levels\WLD_Main_A\Items\_merged.lsf.lsx -->

<?xml version="1.0" encoding="utf-8"?>
<save>
    <version major="4" minor="0" revision="9" build="0" lslib_meta="v1,bswap_guids" />
    <region id="Templates">
        <node id="Templates">
            <children>
                <node id="GameObjects">
                    <attribute id="Flag" type="int32" value="1" />
                    <attribute id="LevelName" type="FixedString" value="WLD_Main_A" /> // Matches the region you returned earlier
                    <attribute id="MapKey" type="FixedString" value="47f37c11-098b-48ee-a908-61cab8a64d69" /> // Generate a UUID for this (this is not the mapkey you looked up)
                    <attribute id="Name" type="LSString" value="WLD_Main_Camp_Box_A" /> // Add a name for the created object
                    <attribute id="TemplateName" type="FixedString" value="3a6bf1fb-2785-406a-85d4-6bd247714591" /> // This is the MapKey of the object you are copying
                    <attribute id="Type" type="FixedString" value="item" />
                    <attribute id="_OriginalFileVersion_" type="int64" value="144537400540922158" />
                    <children>
                        <node id="LayerList">
                            <children>
                                <node id="Layers">
                                    <children>
                                        <node id="Object">
                                            <attribute id="MapKey" type="FixedString" value="WLD_Main_A" /> // Same as LevelName
                                        </node>
                                    </children>
                                </node>
                            </children>
                        </node>
                        <node id="Transform">
                            <attribute id="Position" type="fvec3" value="-661.3397 0.5986 -199.6469" /> // X Y Z coords, no commas, single spaces
                            <attribute id="RotationQuat" type="fvec4" value="0 0.7071068 0 0.7071068" /> // See conversion instructions below
                            <attribute id="Scale" type="float" value="1" /> // Oh hey, you can scale the item larger or smaller with this too btw
                        </node>
                    </children>
                </node>
            </children>
        </node>
    </region>
</save>
¶ Converting Rotation to RotationQuat
The RotationQuat (Quaternions) attribute, needs to have a quaternion instead of a rotation angle. Unfortunately, there isn’t a command in game to give you that, so you have to convert it externally.
You could use a site like this, which allows you to enter degrees along the Y axis on the left and outputs it to quat on the right.
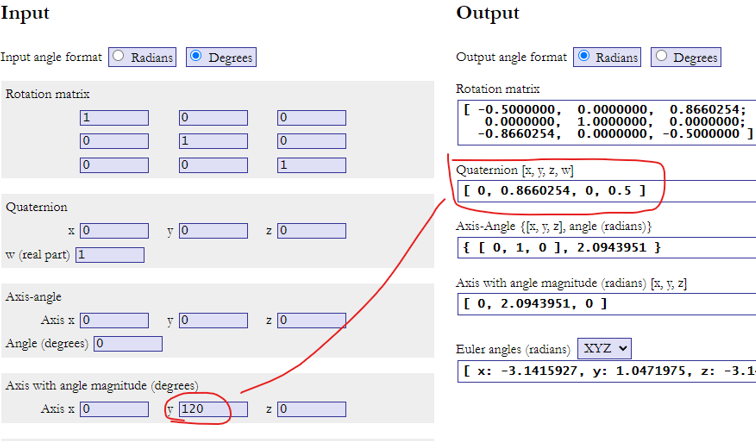
Be sure to change the input on the left to degrees
Here are some pre-converted angles for convenience.
0: "0 0 0 1"
30: "0 0.258819 0 0.9659258"
60: "0 0.5 0 0.8660254"
90: "0 0.7071068 0 0.7071068"
120: "0 0.8660254 0 0.5"
150: "0 0.9659258 0 0.258819"
180: "0 1 0 0"
210: "0 0.9659258 0 -0.258819"
240: "0 0.8660254 0 -0.5"
270: "0 0.7071068 0 -0.7071068"
300: "0 0.5 0 -0.8660254"
330: "0 0.258819 0 -0.9659258"
In our example, we used 90 degrees. So for RotationQuat we would enter: 0 0.7071068 0 0.7071068
¶ Conclusion
That should be all you need to add and position items into BG3 maps. Repeat as needed for multiple items and maps.