¶ Mod Configuration Menu documentation
Baldur’s Gate 3 Mod Configuration Menu (BG3MCM or MCM) is a mod framework created by Volitio that provides a centralized in-game UI, enabling players to intuitively manage mod settings and/or custom UIs defined by mod authors. It provides an API for registering configuration menus and manipulating persistent user preferences via checkboxes, numbers, text inputs, lists, combos/dropdowns, radio buttons, sliders, color pickers, keybindings, etc.
Most importantly, it allows authors to have a robust JSON-like configuration experience without spending hours writing a configuration system, and it’s easy enough to integrate that even novice modders can quickly add support for it in their own mods.
This documentation is aimed at mod authors who want to integrate their mods with MCM. If you are a player looking to use MCM to configure mods, please refer to the Nexus Mods page for instructions. This documentation provides a centralized and thorough guide on the concepts behind MCM, the features it provides to mod authors, and how to integrate MCM into your mod.
You can also use the table of contents below to navigate to a desired section.
You may also use this custom GPT to ask questions about MCM.
¶ Quick-start guide
If you’re looking to quickly integrate MCM into your mod, here’s the process at a glance:
- Create an
MCM_blueprint.jsonfile in the same folder asmeta.lsx - Add MCM as a dependency in your mod’s
meta.lsxfile (guide here) or add"Optional": trueto your blueprint file. - Replace code related to settings in your mod with MCM API calls: get settings’ values with
MCM.Get("settingId").
(MCM adds a globalMCMtable to SE mods providing all MCM functions that can be used)
It’s recommended to just pick an existing blueprint from MCM-integrated mods and adapt it, such as:
Auto Send Food To Camp
Smart Autosaving
MCM demo (as of MCM 1.23)
An LLM is likely able to adapt them into a different blueprint, especially if you also provide it MCM’s blueprint schema for context.
That’s it for a basic integration! MCM will warn you about mistakes in your code or blueprint file.
The rest of this documentation provides detailed explanations of these steps and advanced features.
For basic integration, the important sections are Defining a blueprint and Using values from MCM.
If you’re interested in keybindings, see Adding a keybinding.
¶ Table of Contents
- Mod Configuration Menu documentation
- Quick-start guide
- Table of Contents
- Features for mod authors
- Concepts
- Integrating MCM into your mod
- MCM API functions
- Listening to MCM events
- How validation works
- Localization support
- TODO: ported IMGUI icons
- Notification API
- MCM (1.23) integration showcase/demo
- Closing words
¶ Features for mod authors
Below are listed some nice features that MCM provides to mod authors:
• Easy to use: MCM provides a simple and intuitive way to define your mod’s settings. Integrating MCM into your mod only requires creating a simple blueprint JSON file and replacing a few lines of code;
• UI without writing client-side code: MCM handles the UI for you, so you don’t have to write any client-side code or learn the IMGUI API to display your mod’s settings, since IMGUI is only available on the client side.
• Simplifies settings management: MCM takes care of saving and loading your mod’s settings automatically, so you don’t have to build an entire configuration system to manage JSON files. MCM has 18k+ lines of code so that you don’t have to deal with that.
• Instant saving and loading: Unlike the traditional way of handling settings, MCM-integrated mods update settings in real-time as they are changed, without requiring save reloads;
• Minimizes user error: MCM handles the UI and validation of settings, reducing the risk of user error when configuring your mod and encouraging them to do so safely. By skipping the need for manual editing of configuration files, a very common source of errors, users are less likely to encounter issues or need to ask how to configure your mod.
• Validation checks: MCM runs dozens of validation checks to ensure that your blueprint for integration was correctly written, while providing detailed error messages if something is wrong. It also validates the settings’ values at runtime to ensure that they respect the defined constraints, which is especially useful if JSON settings files were manually edited, something that is supported by MCM;
• NEW IN 1.19 - Keybinding management: MCM offers a robust system for managing keybindings. This feature allows you to easily define, update, and persist keyboard bindings directly from the MCM window, while easily registering callbacks for your actions. With built-in conflict resolution, you can focus on your mod’s functionality without having to write custom input event code, and minimizing conflicts with other mods.
• Supports bespoke UI injection: MCM allows you to inject your own UI elements into the MCM UI, so you could even have a mix of MCM-generated UI and your own custom UI in the same mod. This is useful when your mod has specific features to expose in the UI that are largely unrelated to configuration;
• Notification API: Exposes an IMGUI notification API that allows mods to easily create customizable notifications with options for title, message, duration, and custom buttons.
• Cross-mod settings access: The unified config approach promoted by MCM allows for straightforward access to settings from other mods, as arbitrary implementations are mostly eliminated, facilitating compatibility and interoperability.
• Doesn’t clutter UI: MCM centralizes settings for all mods that use it, so you don’t have to worry about cluttering players’ screens with yet another IMGUI window, thinking when should it initialize, activate, or even about keybindings - and possible conflicts thereof - for showing such windows. Users will have a familiar (Noesis) button in the ESC and main menus for opening MCM.
• Furthermore, you can conditionally hide elements of your configuration based on settings’ values (by usingVisibleIf, more details below).• Robustness: MCM has more than 40 automated server-side tests aiming to ensure that it works as expected, edge cases are handled, and errors are gracefully reported without halting the framework or game; errors from one mod won’t affect the others.
• UI agnostic: MCM was designed to be, first and foremost, a standalone configuration manager. This means that even if support for IMGUI were to be entirely removed or replaced, the underlying structure of MCM would still function correctly;
• This also means that users who can’t see the IMGUI window will still have MCM working as a config manager.• Multiple profiles: MCM has support for creating, saving, loading, and deleting multiple configuration profiles, which is useful for mod authors to separate their testing configurations while developing mods;
• Localization support: MCM supports localizing mod settings, allowing you to optionally provide translations for different languages.
On top of it all, if you currently offer multiple mod versions with different code to avoid dealing with the complexities of providing settings, you can simplify this by using a single version with MCM to introduce options. This approach allows you to avoid creating and maintaining several different .pak releases for your mods.
You can even integrate MCM as an optional requirement (with hardcoded defaults or MCM values if present), although that takes a bit more effort than just adding it as a standard requirement.
¶ Concepts
First, let’s establish some important concepts so that we’re on the same page when discussing MCM. These will be used throughout the documentation:
Setting: A single configuration option that can be set by the user.
Config/Configuration/Settings: All the possible settings; the entire set of settings for a mod.
Blueprint: Defines the structure of a mod’s configuration for MCM to use (with aMCM_blueprint.jsonfile); written by you.
MCM Schema: Dictates the structure of the blueprint; is the ‘metaschema’; defined by MCM.
Additionally, MCM follows semantic versioning. MAJOR updates would probably mean introducing breaking changes to blueprints. I currently don’t have any plans for a MAJOR update.
¶ Integrating MCM into your mod
Mod authors need to integrate their mods with MCM for their settings to appear in the UI. The subsections below go in detail about this process, but it is essentially done in two steps:
- Define the blueprint JSON file for your mod’s settings and place it alongside your mod’s
meta.lsxfile. - Replace your mod’s logic for reading/writing settings with calls using the
MCMAPI, using settings’ IDs as defined in the blueprint.
Anything else is a matter of updating objects (if you’re storing values in tables, for example), adding custom UI (very situational) and creating hotkeys (MCM 1.19+).
It’s extremely recommended to define Mod Configuration Menu as a dependency in your
meta.lsxfile. This allows the game and mod managers to ensure that MCM is loaded before your own mod - eliminating the need to instruct users to do so manually and avoiding incorrect reports/troubleshooting when they don’t! See our guide for adding dependencies.
• Example for listing two dependencies in a meta.lsx file, one being BG3MCM; (Volition Cabinet is not required for MCM)
• You can set dependencies and their minimum required versions. It is also recommended to always set the required version (Version64) of MCM to the version you’re using during the development of your mod.
MCM 1.14+ also verifies dependencies’ versions and warn users if they have outdated versions of any mods.
¶ Defining a blueprint
How does MCM know what settings your mod has? How does it know which ones are numbers, which are checkboxes, what their default values should be, or how to show them nicely in the MCM window?
The MCM_blueprint.json file is how you specify your mod’s configuration definition; this JSON file will define how your settings are to be structured, what are their name, input type, default, etc., allowing for automatic generation of a user-friendly interface and validation of user-set values.
Recap: a blueprint is a JSON file that defines the structure of your mod’s configuration settings. It is used by MCM to generate the UI and validate the settings for you. It should be named
MCM_blueprint.jsonand placed alongside your mod’smeta.lsxfile.
¶ The MCM Schema
The MCM Schema dictates how you should structure your blueprint file, and you can get it from GitHub.
You can also get the MCM IDE Helpers from GitHub.
This schema file can be used to write and validate your MCM_blueprint.json file, as it will help enforcing the intended structure of the MCM Schema in your blueprint file, ensuring that it is correctly formatted and adheres to it.
¶ IDE support
While not mandatory, it is highly recommended to set the schema up in a code editor. By adding this JSON schema entry to your settings in VSCode, for example, you can easily write and validate your blueprint files:
- Press F1, type and select ‘Open User Settings (JSON)’
- Copy the following and paste inside the main object of the JSON you just opened:
"json.schemas": [
  {
    "fileMatch": [
      "MCM_blueprint*.json"
    ],
    "url": "https://raw.githubusercontent.com/AtilioA/BG3-MCM/main/.vscode/schema.json"
  }
],
- This might require a Reload Window or just reopening your editor, but you’re done! You won’t need to do this again, and the schema file will be always up-to-date with MCM releases.
* Alternatively, you can replace the url value with the path to the schema JSON file (e.g., where you place IDEHelpers or Osi.lua files). However, only do so if you have problems with the URL above.
You can also use a service like https://www.jsonschemavalidator.net/s/cV447mjH by pasting your blueprint in the right pane; however, that can be cumbersome, and you’d have to paste the latest schema in the left to make sure you’re not using an older version. Prefer the aforementioned method.
Having the schema file set up in your IDE will help you write the blueprint file correctly, without having to guess the structure or wonder if you’re missing something. A few minor features, such as
ModName(to replace the string used for your mod’s name) are only documented by the JSON schema.
It’s recommended to just pick an existing blueprint from MCM-integrated mods and adapt it.
For reference, you can check out the following examples:
Auto Send Food To Camp
Smart Autosaving
Preemptively Label Containers
MCM demo (as of MCM 1.23)
¶ Schema main components
Following are the main components of the MCM Schema. Don’t stress over this too much, the schema file will guide you while writing blueprints if you have set it up, and MCM will warn you about problems during runtime.
MCM Schema breakdown
- Organizational structure: the MCM Schema defines a hierarchical organization using
TabsandSections:-
Tabs: Serve as top-level organizational units in the MCM. Each tab can exclusively contain eitherSectionsor standaloneSettings.Sections: Sub-divisions within tabs to group related settings.
-
Settings:Id: A unique string identifier for each setting, similar to a variable name in your code; used to reference the setting programmatically.Name: The readable name of the setting as to be displayed in the MCM.Type: Defines the data type and ultimately the UI representation of the setting, with supported types includingint,float,checkbox,text,enum,radio,slider_int,slider_float,drag_int,drag_float,color_picker,color_edit;Default: Specifies the initial value of the setting used during initialization or when a reset is needed. Supports various data types (integer,number,boolean,string,object,null) depending on the setting type.DescriptionandTooltip: Textual explanations of the setting’s purpose and usage, whereDescriptionis visible below the setting’s widget andTooltipappears on hover. It is required to have at least one of these.Options: Additional parameters that tailor the setting’s behavior, applicable to certain types likeenum,radio, sliders and drags. This includes:Choices: The options to be made available forenumandradiotypes.MinandMax: Boundary values for types such asslider/drag.Step: The increment/decrement step forsliderbuttons. Defaults to1forslider_intand0.1forslider_float.Multiline: Whether the text input should be multiline, used fortexttype.
VisibleIf: Allows defining a simple boolean expression that determines the visibility of a setting (also tab or section) based on the values of other settings.
-
Thus, the main content of the blueprint is defined in the Tabs and Settings properties.
Within each tab, you can define either Sections or a list of Settings. Sections provide a way to group related settings together under a header.
Each setting has an Id, Name, Type, Default value, and at least a Tooltip or a Description. Each setting Id must be unique across the entire blueprint, and that is validated by one of the many validation checks MCM performs.
Future versions of MCM might make this structure less strict, allowing nesting tabs inside sections and vice-versa.
If your mod is symlinked, you can try out changes to your mod’s blueprint in-game by using
resetin the console without having to restart the game every time you make a change to the blueprint file.
¶ VisibleIf: Conditional visibility
A special property in the MCM Schema is VisibleIf. You can use it to conditionally show or hide Tabs, Sections, and individual Settings based on other settings’ current values (having primitive values, i.e.: boolean, number, string).
- Supported on:
Tab,Section, andSettingobjects in your blueprint - Evaluation: runs against current in-memory values
- Default logic: all conditions are combined using a boolean
ANDunless you setLogicalOperatorto"or"
Shape:
"VisibleIf": {
  "LogicalOperator": "and", // or "or" (optional; defaults to "and")
  "Conditions": [
    {
      "SettingId": "<id-of-another-setting>",
      "Operator": "==",           // one of: ==, !=, >, <, >=, <=
      "ExpectedValue": true // some primitive value of the same type as the setting
    }
  ]
}
Notes and limitations:
SettingIdmust reference a valid SettingIdin the same blueprint.- Hiding a container (Tab/Section) hides all of its children regardless of their own
VisibleIf. VisibleIfcontrols visibility only. The values of the settings are not modified and are left as they are; if you hide a Setting that has valuetrue, it will still be read astrue.
VisibleIf example usage
- Show a Setting only for a specific enum option:
{
  "Id": "custom_seed",
  "Name": "Custom Seed",
  "Type": "int",
  "Default": 0,
  "VisibleIf": {
    "Conditions": [
      { "SettingId": "randomization_mode", "Operator": "==", "ExpectedValue": "Custom" }
    ]
  },
  "Tooltip": "Only used when Mode is Custom."
}
- Show a Section only when a toggle is enabled:
{
  "SectionId": "advanced",
  "SectionName": "Advanced Options",
  "VisibleIf": {
    "Conditions": [
      { "SettingId": "enable_advanced", "Operator": "==", "ExpectedValue": true }
    ]
  },
  "Settings": [ /* ... */ ]
}
¶ Widget reference
This section summarizes each supported Type in MCM_blueprint.json, cross-referenced against the schema. It focuses on widget behavior, required vs. optional fields, and per-widget options. For schema setup in your editor, see IDE support. Dedicated sections for keybindings and lists are available below.
Note: All widget types require at least one of Description or Tooltip.
¶ int
- Renders as: Integer input field.
- Best for: Whole-number values like counts.
- Required fields:
Default(integer). - Options: None.
- Caveats: Non-integer input will be rejected or coerced to an integer.
¶ float
- Renders as: Float input field.
- Best for: Decimal values such as percentages or multipliers.
- Required fields:
Default(number). - Options: None.
- Caveats: Value should be a number; avoid using for discrete choices that belong in
enum/radio.
¶ checkbox
- Renders as: Standard on/off checkbox.
- Best for: Boolean toggles.
- Required fields:
Default(boolean). - Options: None.
- Caveats: Prefer for simple on/off features.
¶ text
- Renders as: Single-line text input by default.
- Best for: Short user-provided strings.
- Required fields:
Default(string). - Optional fields:
Options.Multiline: Whentrue, the input renders as a multi-line text box instead of a single line.
If you need structured input, consider list_v2 or multiple settings instead of parsing free-form text.
¶ enum
- Renders as: Dropdown list.
- Best for: Selecting exactly one choice from a longer list.
- Required fields:
Default(string);Options.Choices(array of strings, minimum 1). - Options: None beyond
Choices. - Caveats:
Defaultshould match one of theChoicesto avoid validation warnings.
¶ radio
- Renders as: Radio buttons (only one can be selected).
- Best for: Small, visible sets of choices.
- Required fields:
Default(string);Options.Choices(array of strings, minimum 1). - Options: None beyond
Choices. - Caveats: Use
enumfor long lists;radiois best for a short, visible set.
¶ slider_int
- Renders as: Integer slider.
- Best for: Choosing a whole-number value within a range.
- Required fields:
Default(integer);Options.MinandOptions.Max(numbers). - Optional fields:
Options.Step: Increment for the slider buttons (default1).
¶ slider_float
- Renders as: Float slider.
- Best for: Choosing a decimal value within a range.
- Required fields:
Default(number);Options.MinandOptions.Max(numbers). - Optional fields:
Options.Step: Increment for the slider buttons (default0.1).
¶ drag_int
- Renders as: Draggable integer input.
- Required fields:
Default(integer);Options.MinandOptions.Max(numbers). - Options: None beyond
Min/Max.
¶ drag_float
- Renders as: Draggable float input.
- Required fields:
Default(number);Options.MinandOptions.Max(numbers). - Options: None beyond
Min/Max.
¶ list_v2
- Renders as: Modern list editor that replaced the deprecated
listtype. Provides a text input for adding items, per-item enable toggles, and optional search. - Best for: Managing collections (allow/deny lists, presets, etc.).
- Required fields:
Default(object). In practice, defaults are expected to follow the list format used by MCM (Enabledand anElementsarray of{ name, enabled }entries). - Optional fields:
Options.PageSize: Items shown per page (integer; schema bounds 5–20, defaults to 10 in schema examples).Options.ShowSearchBar: Whentrue, shows a search bar for filtering items.Options.ReadOnly: Whentrue, disables adding/removing items while still allowing toggles.Options.AllowReordering: Whentrue, enables drag-to-reorder in the list UI.Options.Suggestions: Array of strings shown as suggestions while typing (can also be injected dynamically viaMCM.List.InsertSuggestions).
- Caveats:
- MCM automatically migrates old
listsettings tolist_v2when the setting ID stays the same. Plan for this if you previously usedlist. - For advanced behaviors (like dynamic suggestions), see the list section and the
MCM.ListAPI.
- MCM automatically migrates old
¶ color_picker
- Renders as: Full color picker with a square picker area plus RGBA input fields.
- Best for: Choosing colors with both visual and numeric control.
- Required fields:
Default(array of numbers, typically RGBA in the 0–1 range). - Options: None.
- Caveats: Ensure your mod code expects an array (not a hex string).
¶ color_edit
- Renders as: Compact color editor showing only RGBA fields.
- Best for: Quick numeric tweaks to RGBA values.
- Required fields:
Default(array of numbers, typically RGBA in the 0–1 range). - Options: None.
- Caveats: Same data shape as
color_picker; only the UI differs.
¶ keybinding_v2
- Renders as: Hotkey configuration that appears in MCM’s Hotkeys page.
- Best for: Configurable actions that need keybindings.
- Required fields:
Default(object withKeyboardand/orMouseconfig, optionallyEnabled). - Optional fields:
Options.ShouldTriggerOnKeyDown: Trigger when the key is pressed (defaulttrue).Options.ShouldTriggerOnKeyUp: Trigger when the key is released (defaultfalse).Options.ShouldTriggerOnRepeat: Trigger repeatedly while held (defaultfalse).Options.IsDeveloperOnly: Hide unless developer mode is enabled (defaultfalse).Options.BlockIfLevelNotStarted: Block in menus before the level starts (defaultfalse).Options.PreventAction: Whentrue, blocks the game’s original action (defaulttrue).
- Caveats:
- Hotkeys do nothing unless you register a callback with
MCM.Keybinding.SetCallback; see Adding a keybinding. - Mouse buttons are not yet supported.
- Hotkeys do nothing unless you register a callback with
¶ event_button
- Renders as: Button that triggers a Lua callback when clicked.
- Best for: One-off actions rather than stored values.
- Optional fields:
Default: Not applicable (buttons don’t store values).Options.ConfirmDialog: Confirmation dialog config withTitle,Message,ConfirmText,CancelText(all required if provided).Options.Cooldown: Seconds between clicks (-1for infinite cooldown,0/undefined for none).Options.Icon: Icon config (Namerequired, optionalSizewithWidth/Height).Options.Label: Override the button label text.
- Caveats: Ensure your mod registers the button callback in code (see the EventButton API) or the click will have no effect.
¶ MCM API functions
As of version 1.14+, MCM introduces a global MCM table (can be called anywhere in your code) that simplifies MCM usage such as access and modification of settings’ values. This should be used for any operations with MCM, avoiding usage of Mods.BG3MCM internals unless explicitly stated in the documentation.
• All
modUUIDparameters are optional and default to the UUID of the mod that calls the function.
• Client-only functions will not exist on the server context.
• For full details and up-to-date signatures, see the code in BG3MCM’sMCMAPIMethods.luafile.
¶ Core API
| Function | Description | Client | Server |
|---|---|---|---|
MCM.Get(settingId, modUUID?) |
Gets the value of a setting | ✅ | ✅ |
MCM.Set(settingId, value, modUUID?, shouldEmitEvent?) |
Sets the value of a setting | ✅ | ✅ |
¶ EventButton API
Blueprint example
"Id": "EventButtonExample",
  "Name": "Event Button example",
  "Type": "event_button",
  "Description": "Click this button to trigger an action in the mod.",
  "Options": {
      "ConfirmDialog": {
          "Title": "Confirm Action",
          "Message": "Are you sure you want to perform this action?",
          "ConfirmText": "Yes, do it",
          "CancelText": "No, cancel"
      },
      "Cooldown": 5,
      "Icon": {
          "Name": "Skill_Fighter_ActionSurge"
      },
      "Label": "Fallback Button"
  },
  "Tooltip": "Click this button and see a confirmation dialog.",
  "Handles": {
        "NameHandle": "h...",
        "DescriptionHandle": "h...",
        "EventButtonHandles": {
            "ConfirmDialogHandles": {
                "TitleHandle": "h...",
                "MessageHandle": "h...",
                "ConfirmTextHandle": "h...",
                "CancelTextHandle": "h..."
            },
            "LabelHandle": "h..."
        }
    }
| Function | Description | Client | Server |
|---|---|---|---|
MCM.EventButton.IsEnabled(buttonId, modUUID?) |
Returns true if the event button is enabled, false if disabled, or nil if not found |
✅ | ❌ |
MCM.EventButton.ShowFeedback(buttonId, message, feedbackType, modUUID?, durationInMs?) |
Shows a feedback message for an event button. feedbackType can be "success", "error", "info", or "warning" |
✅ | ❌ |
MCM.EventButton.RegisterCallback(buttonId, callback, modUUID?) |
Registers a callback for an event button | ✅ | ❌ |
MCM.EventButton.UnregisterCallback(buttonId, modUUID?) |
Unregisters a callback for an event button | ✅ | ❌ |
MCM.EventButton.SetDisabled(buttonId, enabled, tooltipText?, modUUID?) |
Sets the enabled state and optional tooltip for an event button | ✅ | ❌ |
¶ Keybinding API
These methods operate on keybinding_v2 settings.
| Function | Description | Client | Server |
|---|---|---|---|
MCM.Keybinding.Get(settingId, modUUID?) |
Gets a human-readable keybinding string | ✅ | ❌ |
MCM.Keybinding.GetRaw(settingId, modUUID?) |
Gets raw keybinding data | ✅ | ❌ |
MCM.Keybinding.SetCallback(settingId, callback, modUUID?) |
Registers a callback for a keybinding | ✅ | ❌ |
¶ List API
These methods operate on list_v2 settings.
| Function | Description | Client | Server |
|---|---|---|---|
MCM.List.GetEnabled(listSettingId, modUUID?) |
Gets a table of enabled items in a list | ✅ | ✅ |
MCM.List.GetRaw(listSettingId, modUUID?) |
Gets raw list setting data | ✅ | ✅ |
MCM.List.IsEnabled(listSettingId, itemName, modUUID?) |
Checks if a specific item is enabled in a list | ✅ | ✅ |
MCM.List.SetEnabled(listSettingId, itemName, enabled, modUUID?, shouldEmitEvent?) |
Sets the enabled state of a list item | ✅ | ✅ |
MCM.List.InsertSuggestions(listSettingId, suggestions, modUUID?) |
Inserts suggestions below the input of a list_v2 widget |
✅ | ❌ |
¶ Store API
The Store API allows mods to persist custom key-value data independently of the blueprint system. Starting with MCM 1.40+, it supports multiple storage backends, including Script Extender’s ModVars (save-scoped) and JSON files (global).
The JSON storage allows saving values to JSON files without needing to define a blueprint. This is useful for storing save-independent data like user preferences and cache state.
• ModVar storage is the default, ensuring variables are unique to each save file.
• The Store API is type-safe and supports custom validation.
| Function | Description | Client | Server |
|---|---|---|---|
MCM.Store.RegisterVar(var, options?) |
Registers a variable with type constraints and defaults. | ✅ | ✅ |
MCM.Store.Get(var, modUUID?) |
Gets a stored value, or the registered default if not set | ✅ | ✅ |
MCM.Store.Set(var, value, modUUID?) |
Sets a stored value with automatic persistence | ✅ | ✅ |
MCM.Store.GetAll(modUUID?) |
Gets all stored key-value pairs for the mod | ✅ | ✅ |
Store API usage example
-- Register variables at mod initialization (e.g., in BootstrapShared.lua)
-- COMING SOON: 'modvars' storage (expected in 1.41+)
-- Defaults to 'json' storage (global)
MCM.Store.RegisterVar("difficulty_level", {
    type = "number",
    default = 1,
    validate = function(v) return v > 0 end
})

-- Register with specific SE ModVar parameters
MCM.Store.RegisterVar("player_class_custom", {
    default = "None",
    storage = "modvar",
    storageConfig = {
        SyncToClient = true, -- (default)
        Persistent = true -- (default)
    }
})

-- Register for global (JSON) persistence
MCM.Store.RegisterVar("last_opened_mod", {
    default = "",
    storage = "json"
})

-- Get and Set values
local difficulty = MCM.Store.Get("difficulty_level")
MCM.Store.Set("difficulty_level", difficulty + 1)
¶ Window and tab APIs
These methods operate on the MCM window, and can be used to control the opening and closing of MCM, as well as opening a specific mod’s tab.
| Function | Description | Client | Server |
|---|---|---|---|
MCM.OpenMCMWindow() |
Opens the MCM window | ✅ | ❌ |
MCM.CloseMCMWindow() |
Closes the MCM window | ✅ | ❌ |
MCM.OpenModPage(tabName, modUUID?, shouldEmitEvent?) |
Opens a specific mod’s tab in the MCM window | ✅ | ❌ |
MCM.InsertModMenuTab(tabName, tabCallback, modUUID?) |
Inserts a custom tab into the MCM window | ✅ | ❌ |
¶ Deprecated Functions
The following functions are deprecated and should be replaced with the new API:
MCM.GetList→ UseMCM.List.GetEnabledMCM.SetListElement→ UseMCM.List.SetEnabledMCM.SetKeybindingCallback→ UseMCM.Keybinding.SetCallback
¶ Table-based arguments
Starting with MCM version 1.38+, this API supports table-based arguments as a better alternative to positional arguments. This pattern makes function calls more readable and self-documenting, is easier to skip optional parameters without placeholder nil values, allows new optional parameters to be added without breaking existing code, and has better autocomplete when using MCMIdeHelpers. Example:
MCM.EventButton.ShowFeedback({
    buttonId = "my_button",
    message = "Action completed successfully!",
    feedbackType = "success",       -- or use MCM.EventButton.FeedbackTypes.SUCCESS
    modUUID = "optional-mod-uuid",  -- Optional, will default to your mod UUID
    durationInMs = 5000             -- Optional, already defaults to 5000
})
¶ Using values from MCM
Mod authors can access the values set by the player through the MCM API from anywhere in their mod’s code.
  -- Get the value of a setting with the ID "MySetting"
  local mySettingValue = MCM.Get("MySetting")
  -- Set the value of a setting
  MCM.Set("MySetting", newValue)
You can also listen to changes to settings values by listening to mod events like this (more on Listening to MCM events):
-- In your MCM-integrated mod's code
Ext.ModEvents.BG3MCM["MCM_Setting_Saved"]:Subscribe(function(payload)
    if not payload or payload.modUUID ~= ModuleUUID or not payload.settingId then
        return
    end

    if payload.settingId == "debug_level" then
        _D("Setting debug level to " .. payload.value)
        MyMod.DebugLevel = payload.value
    end
end)
Remember, SE injects a ModuleUUID constant that holds the value of the mod you’re writing into your runtime.
¶ Adding a keybinding
MCM 1.19 introduces built-in support for keybinding management, allowing mods to define and register hotkeys with ease. This system provides a familiar interface for users to customize keybindings while handling conflicts automatically.
If you wanted to add a hotkey to your mod without a system like MCM, you’d have to:
- Store and load the player’s chosen key combination (e.g., CTRL + J) somewhere (like a file).
- Write code to listen for key presses in the game.
- Every time a key is pressed, check if it matches the player’s saved combination, then run your mod’s action.
- Optionally build a UI element where the player can view and set the key combination.
- Deal with potential conflicts if another mod uses the same combination, and generally a ton of other edge cases not considered here.
This is a lot of work and prone to errors! MCM solves this by:
- Providing a standardized way for your mod to declare it has a keybinding action in its MCM blueprint.
- Providing a simple way for your mod to register the Lua function (callback) that should run when the hotkey is pressed.
- Handling all the low-level work: loading and saving keybinding preferences, UI creation, listening for input, checking against registered keybindings, detecting conflicts, and calling the correct callback function in your mod.
Essentially, you define what your hotkey action is and what code runs, and MCM handles how it’s triggered by player input and managed in the UI.
¶ Defining a keybinding
To define a keybinding, add it as a keybinding_v2 setting anywhere in your mod’s blueprint file. Below is an example of transitioning from the old format to the new keybinding_v2 format:
Before (deprecated keybinding format):
{
    "Id": "key_teleport_party_to_you",
    "Name": "Teleport party to you shortcut",
    "Type": "keybinding",
    "Default": {
        "Modifier": "LShift",
        "ScanCode": "T"
    }
}
After (keybinding_v2 format):
{
    "Id": "key_teleport_party_to_you",
    "Name": "Teleport party to you shortcut",
    "Type": "keybinding_v2",
    "Default": {
        "Keyboard": {
            "Key": "T",
            "ModifierKeys": ["LShift"]
        }
    },
    // Options are optional; default values are shown
    "Options": {
        "ShouldTriggerOnKeyDown": true,
        "ShouldTriggerOnKeyUp": false,
        "ShouldTriggerOnRepeat": false,
        "IsDeveloperOnly": false,
        "BlockIfLevelNotStarted": false
    }
}
MCM also provides additional options to control how a keybinding behaves. These options can be set within the Options object when defining a keybinding in the blueprint file.
Available Options:
| Option | Default | Description |
|---|---|---|
ShouldTriggerOnKeyDown |
true |
Triggers the keybinding callback when the key is pressed down. This is the default behavior. |
ShouldTriggerOnKeyUp |
false |
Triggers the callback when the key is released. |
ShouldTriggerOnRepeat |
false |
Continuously triggers the callback while the key is held down. |
IsDeveloperOnly |
false |
Whether to hide this keybinding if developer mode is disabled. |
BlockIfLevelNotStarted |
false |
Prevents the keybinding from triggering when the game level has not started yet. This is useful for actions that should only be available in-game, not in the main menu. |
These options are not mutually exclusive, meaning authors can use any combination of them. For example, setting ShouldTriggerOnRepeat to true allows an action to repeat continuously while the key is held, which may be useful for certain keybindings. Note that the Options object is entirely optional and may be omitted if the default behavior is sufficient for the keybinding’s needs.
¶ Registering a keybinding callback
Keybindings must be registered in the client context, as user input is inherently client-sided. You only need a basic client-code setup; you can read more about it in this guide.
To define what happens when a keybinding is triggered, register a callback using the MCM.Keybinding.SetCallback function available in the client context:
MCM.Keybinding.SetCallback('key_teleport_party_to_you', function(e)
    Ext.Net.PostMessageToServer("FS_TeleportPartyToYou", Ext.Json.Stringify({ skipChecks = false }))
end)
In this example, when the keybinding is pressed, a network message is sent to the server to execute the teleport action.
Your callback is called with the input event passed as param.
¶ Client vs. Server execution
MCM does not enforce whether keybinding actions should be executed on the client or server. While simple client-side actions can be handled directly in the callback, mods requiring server execution (e.g., Osiris-based actions) should use a network message, as shown above. The server context would then have a net listener, such as in this simplified example:
Ext.RegisterNetListener("FS_TeleportPartyToYou", function()
    print("Do something")
end)
This is a basic interaction between server and client that is often necessary when dealing with client-sided functionality. You may refer to networking tutorials in this wiki.
This system provides mod authors with the flexibility to decide how their keybindings should function while ensuring ease of integration.
¶ Inserting custom UI elements
Note that these methods are only available in the client context. They cannot be executed from server-side code, since UI-related functionality is strictly handled on the client side. If you’re trying them out with the console, run
clientbefore executing these methods.
MCM allows mod authors to insert custom UI elements into the MCM UI. This is only needed if you want to define custom IMGUI objects within MCM, beyond what’s generated via your blueprint file.
This can be done using the InsertModMenuTab function from the MCM global table added by MCM:
MCM.InsertModMenuTab(ModuleUUID, "Tab name", function(tabHeader)
    local myCustomWidget = tabHeader:AddButton("My custom widget")
    myCustomWidget.OnClick = function()
        _D("My custom widget was clicked!")
    end
end)
This will create a new tab or insert the content at the end of an existing one.
You can define an entire tab’s content — not just a widget — and call the
InsertModMenuTabfunction to insert it into the MCM window, inside the space dedicated for your mod.
• For reference, Mod Uninstaller uses both MCM-generated and custom IMGUI elements; there’s also EasyCheat that leverages theInsertModMenuTabmethod to add custom logic inside MCM.
¶ Defining lists
MCM 1.17 introduced list_v2 to supersede the now deprecated list input type. It offers better UI and ergonomics, with more granular control over lists and their elements.
MCM will automatically migrate players’ old
listvalues tolist_v2if the setting ID remains the same.
MCM.List contains useful methods for dealing with list_v2 settings.
¶ Inserting suggestions for ListV2 settings
The InsertSuggestions method in the MCM.List table allows mod authors to insert suggestions/‘search results’ into a list_v2 setting. This is particularly useful for providing users with dynamic suggestions based on their input as they type in the add input field of the setting.
Example: insert suggestions a, b, c, aba, acaca, and abaca into the ignore_weapons list_v2 setting for the mod UUID 1c132ec4-4cd2-4c40-aeb9-ff6ee0467da8 (Auto Send Food To Camp):
-- Client context only
MCM.List.InsertSuggestions("ignore_weapons", {"a","b","c","aba","acaca","abaca"}, "1c132ec4-4cd2-4c40-aeb9-ff6ee0467da8")
- listSettingId: The string with the ID of the
list_v2setting to receive the suggestions. - suggestions: Table of strings to show as suggestions.
- modUUID?: Optional. Defaults to the current mod; pass a specific UUID to target another mod’s UI. Must have the setting corresponding to
listSettingIdin its blueprint.
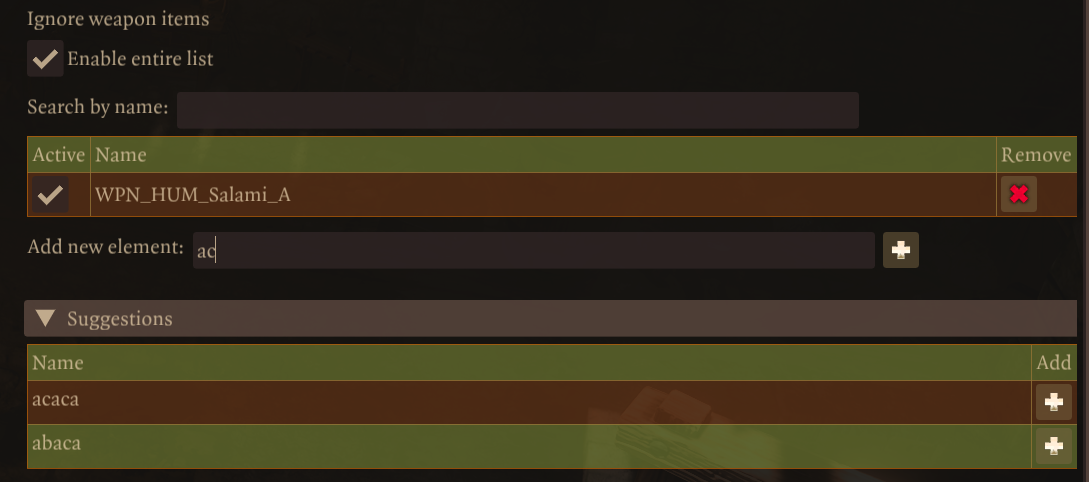
All searches on MCM use fuzzy matching.
¶ Listening to MCM events
• With the introduction of
ModEventsin SE v18, the previous method for listening to MCM events was deprecated. MCM will maintain backward compatibility with the net message method for the time being.
• Prior to version 1.11, mod events were handled using a workaround that relied on net messages, which were originally designed for communication within a single mod. That approach was necessary due to the absence of a dedicated mod event system in SE at that time.
Event usage prior to 1.11 (DEPRECATED)
Up to 1.10, MCM used a set of channels to communicate between the client and server. Some of these can be useful for mod authors to listen to, as they can use this to update their mod’s behavior based on changes from MCM, such as when a setting is saved:
MCM_Saved_Setting: fired whenever a setting value has been saved and written to the settings JSON file by MCM. The payload contains the setting ID and the new value. Example usage:
-- In your MCM-integrated mod's code
Ext.RegisterNetListener("MCM_Saved_Setting", function(call, payload)
    local data = Ext.Json.Parse(payload)
    if not data or data.modGUID ~= ModuleUUID or not data.settingId then
        return
    end

    if data.settingId == "debug_level" then
        _D("Setting debug level to " .. data.value)
        MyMod.DebugLevel = data.value
    end
end)
Here are some other events that can be listened to:
MCM_Setting_Reset: Fired when a setting is reset to its default value.- Profile-related events:
MCM_Server_Created_Profile: Fired when a new profile is created.MCM_Server_Set_Profile: Fired when a profile is set as the active one.MCM_Server_Deleted_Profile: Fired when a profile is deleted.
- Other events:
MCM_Mod_Tab_Added: Fired when a mod inserts a custom tab into the MCM UI.MCM_Mod_Tab_Activated: Fired when the user clicks a mod in the mod list in MCM’s left panel.
Always verify the
modGUIDin the payload to confirm that the event pertains to the mod of interest (typically your own, which you have global access to viaModuleUUID).
Event changes in 1.11
Some names were changed with this refactor:-
MCM_Saved_Setting->MCM_Setting_Saved -
MCM_Reset_All_Mod_Settings->MCM_All_Mod_Settings_Reset -
MCM_Created_Profile->MCM_Profile_Created -
MCM_Set_Profile->MCM_Profile_Activated -
MCM_Deleted_Profile->MCM_Profile_Deleted -
MCM_User_Opened_Window->MCM_Window_Opened -
MCM_User_Closed_Window->MCM_Window_Closed -
modGUID(payload param) ->modUUID
These changes were implemented in a backwards-compatible way.
As of 1.11, MCM uses Script Extender’s ModEvents to communicate between different mods. This allows mod authors to subscribe to these events and implement specific behaviors in response to changes from MCM, such as when a setting is saved:
MCM_Setting_Saved: fired whenever a setting value has been saved and written to the settings JSON file by MCM. The payload contains information such as the UUID of the mod that added this setting, the setting ID and the new value. Example usage:
-- In your MCM-integrated mod's code
Ext.ModEvents.BG3MCM["MCM_Setting_Saved"]:Subscribe(function(payload)
    if not payload or payload.modUUID ~= ModuleUUID or not payload.settingId then
        return
    end

    if payload.settingId == "debug_level" then
        _D("Setting debug level to " .. payload.value)
        MyMod.DebugLevel = payload.value
    end
end)
Always verify the
modUUIDin the payload to confirm that the event pertains to the mod of interest (typically your own, which you have global access to viaModuleUUID).
Here are the events that can be listened to:
| Event name | Description | Payload content |
|---|---|---|
MCM_Setting_Saved |
Fired whenever a setting value has been saved and written to the settings JSON file by MCM. | modUUID: The UUID of the mod settingId: The ID of the setting value: The new value of the setting oldValue: The old value of the setting |
MCM_Setting_Reset |
Fired when a setting is reset to its default value. | modUUID: The UUID of the mod settingId: The ID of the setting defaultValue: The default value of the setting |
MCM_Profile_Created |
Fired when a new profile is created. | profileName: The name of the created profile newSettings: The settings of the new profile |
MCM_Profile_Activated |
Fired when a profile is set as the active one. | profileName: The name of the active profile |
MCM_Profile_Deleted |
Fired when a profile is deleted. | profileName: The name of the deleted profile |
MCM_Mod_Tab_Added |
Fired when a mod inserts a custom tab into the MCM UI. | modUUID: The UUID of the mod tabName: The name of the tab added |
MCM_Mod_Tab_Activated |
Fired when a player clicks a mod in the mod list in MCM’s left panel. | modUUID: The UUID of the mod |
MCM_Mod_Subtab_Activated |
Fired when a subtab within a mod tab is activated. | modUUID: The UUID of the mod subtabName: The name of the activated subtab |
MCM_Window_Opened |
Fired when a player opens the MCM window. | |
MCM_Window_Closed |
Fired when a player closes the MCM window. |
For the most up-to-date information, please refer to this file in the Git repository: EventChannels.lua
¶ How validation works
Validation is divided into two main categories: blueprint validation and settings validation. Blueprint validation ensures that the blueprint JSON file is correctly formatted and adheres to the MCM Schema. Settings validation, on the other hand, ensures that the actual or to-be-stored settings values are valid and respect the constraints defined in the blueprint.
MCM performs validation checks when:
- Blueprint validation:
- Loading blueprints from the
MCM_blueprint.json;
- Loading blueprints from the
- Settings validation:
- Loading settings from a JSON file (+ e.g., switching between profiles);
- Setting values programmatically through the API;
- Processing user input from the UI.
• Settings not present in the blueprint will be removed from the settings JSON file;
• Invalid settings values will be replaced with their respective default value as specified in the blueprint;
• New settings are automatically introduced to the settings JSON file when new settings are added to the blueprint;
Therefore, mod authors can safely add or remove settings from the blueprint without worrying about inconsistencies in the settings JSON file.
¶ Localization support
In your blueprint, you can optionally define localization handles for various elements of the configuration, including:
- Tabs names and descriptions
- Sections names
- Settings names, descriptions, and tooltips
- Enum/radio choice labels
This is achieved through the use of “handles” - unique identifiers that can be used to look up the localized strings, just as used by the vanilla game. For any element that you can put a user-facing string in the blueprint, you can use a handle by adding a Handles object in the same level as the element, like this:
{
    "TabId": "myTab",
    "TabName": "My tab default display name",
    "Handles": {
        "NameHandle": "h3b019e17g75fcg48ccg8063g4de5bfcc7792"
    }
},
These handles should have been listed in a loca file in your mod in order to be used;
• If handles are provided and their content can be retrieved, the localized string will be used instead of the usual name/description/tooltip;
• If the handle is not found, the usual string will be used; in the above example, it would beTabName’s content.
The BG3 Mod Helper extension can help you create localization files and mass replace strings with handles conveniently added to your localization files.
¶ TODO: ported IMGUI icons
–
¶ Notification API
(NEW IN MCM 1.16)
MCM’s Notification API allows mods to create customizable notifications within the client context, provided that MCM is installed. Notifications can be tailored with specific titles, messages, durations, and visibility preferences.
¶ Features
- Available in client context: Notifications work within the client context, so they can be used in the main menu too, unlike the server-side Osiris message boxes.
- Custom title and message: Define the title and content of the notification.
- Display preferences: Configure notifications to show for a certain duration, only once, etc.
- Custom buttons: Add buttons with associated callback functions for user interaction.
¶ Example usage
NotificationManager is added to all mods’ global tables if MCM is loaded.
To display a success notification with default options and a custom ‘Log’ button, use the following code in the client context:
NotificationManager.ShowSuccess('notification_id', 'Test Title', 'This is a test success message', {
  duration = nil, -- Duration can be set to nil for default behavior
  dontShowAgainButton = true, -- Option to show a button to prevent future notifications
  dontShowAgainButtonCountdownInSec = 5, -- Countdown for the 'don't show again' button
  displayOnceOnly = false, -- Set to true to show the notification only once
  buttons = {["Log"] = function() P("Log button clicked") end } -- Custom button with callback on click
})
The options table (fourth param) is optional.
Analogous functions are available for other severity levels (e.g., NotificationManager.ShowError, NotificationManager.ShowWarning, NotificationManager.ShowInfo).
¶ MCM (1.23) integration showcase/demo
The demo below showcases the different types of config options that can be used (almost all of them as of v1.23). The demo also shows how to insert custom UI elements into the menu, how to listen and react to MCM events, and how to register callbacks for keybinding actions.
¶ Closing words
I hope this documentation has provided you with a clear understanding of how to integrate MCM into your mod. If you have any suggestions or encountered any points of confusion or errors, no matter how small or mundane, please let me know on the Nexus page or on Discord (BG3MC). I’m keen on ensuring MCM has excellent design and documentation. I also hope MCM enhances not only your development experience but provides a better experience for your users too!
I’d like to thank the community again for their support and feedback, as well as the mod authors who have integrated MCM into their mods. It’s been awesome to see what you’ve been building with it so far.