¶ Dear ImGui
This multi-part tutorial covers the integration of ImGui using ScriptExtender.
- Part 1 covers: Setup, First Steps and general creation of ImGui objects.
- Part 2 covers: [NotYetReleased] Component logic
- Part 3 covers: [NotYetReleased] Events and how to use them
- Part 4 covers: [NotYetReleased] Styling of ImGui objects
Before going into the specifics, please note the following points:
This tutorial assumes that you know how to install mods and how to create them. If you are new to this, please familiarize yourself with them through other relevant Wiki pages:
This tutorial expects of you to have some basic understanding on working with ScriptExtender.
If you don’t have any knowledge about ScriptExtender please do visit the introductory pages first: “Getting Started with Script Extender”
This Tutorial will get into parts of OOP (Object-Oriented-Programming). If you are not familiar with it, please visit “The Basics of LUA” (A brief introduction to Metatables)
This tutorial is meant to be read from top to bottom since it is explained as you go along with it.
New topics build upon those before, so if you skip ahead, some stuff might not make sense to you. >Its not going to give you fish, it will teach you how to fish.
For testing purposes of this tutorial consider setting up a symlink.
Now whenever you add new lines of code, you can just reload your save to test the changes you’ve made.
¶ 1. Workspace Structure
¶ 1.1. Folders
To have an easier time to differentiate between all of your mods scripts it is advised to think about where you want to put your ImGui scripts.
It should be noted that in addition to a BootstrapServer.lua script we’ll also need a BootstrapClient.lua script, because the UI portion of it will be on a users client itself and not on the server.
Meaning we might as well differentiate between them by creating an additional “Client” folder, next to the one you might already have, called “Server”.
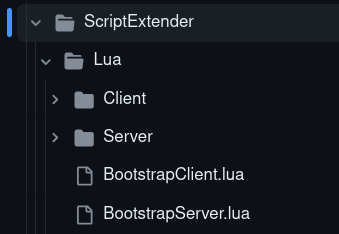
For the future, everything that has to do with ImGui itself will be within the “Client” folder and everything that has to do with the server will be in the “Server” folder.
¶ 1.2. Scripts
For a general introduction to ImGui this won’t be necessary and you can just create a new .lua script within the “Client” folder, but its something to keep in mind depending on where you want to go with it.
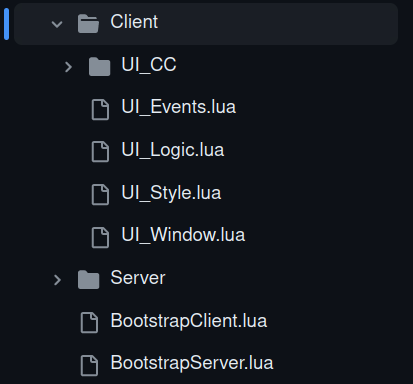
For larger-scale mods, it’s recommended to segment your UI script into multiple parts, such as MyUI_Window.lua, MyUI_Logic.lua, MyUI_Events.lua, and MyUI_Style.lua.
While not essential for a basic ImGui introduction, this approach facilitates scalability and organization as your project evolves.
Don’t forget to always add the scripts you are creating within the “Client” folder to your BootstrapClient.lua script. You do this the same way as with the other Bootstrap script, just a different path since the files will be within the “Client” folder. So
Ext.Require("Client/YourScript.lua")
If you were to use sub-folders within the “Client” folder it would go like this
Ext.Require("Client/YourFolder/YourScript.lua")
You do it the same way if you were to use sub-folders within your “Server” folder.
¶ Something to consider in general
UI scripts can get overwhelming, especially when dealing with multiple sections within your window.
Don’t hesitate to use --comments liberally to navigate through larger sections.
Some users employ extensive comment blocks for clarity, or some none at all and that’s perfectly fine! Everyone should do it how they can differentiate between different sections best.
However, there’s another tool you might find useful: “Regions”.
--#region YourRegionTitle
    Your Code
--#endregion
This will make an entire code section collapsable, which would normally not be a thing for ImGui since they don’t count as functions which are naturally collapsable.
So whenever you will work with a bigger section of your UI, utilizing regions might be beneficial to you.
¶ 2. New File, New Me
¶ 2.1. Creating a window and finding more information
You’ve created your UI Lua script and are ready to roll.
The first step is to get an actual frame or window to work with, which we achieve through ScriptExtender.
If you’ve followed the ScriptExtender guide, you should have an ExtIdeHelpers.lua file.
Otherwise it can also be found here
In it, locate “Ext_ClientImgui” (Ctrl+F is your friend). Here, you’ll find the very first function we can utilize.
You will notice that it says:
--- @class Ext_ClientIMGUI
--- @field EnableDemo fun(a1:boolean)
--- @field NewWindow fun(a1:string):ImguiHandle
local Ext_ClientIMGUI = {}
Which means, the Ext_ClientIMGUI object is a class which has 2 fields available which are functions (fun). (You can even already see what kind of arguments they require)
So by typing:
Ext.IMGUI.NewWindow("My ImGui Window") -- Yes, Ext_ClientIMGUI is used as Ext.IMGUI
you have your very first window!
And you will notice it says “My ImGui Window” in its title bar, thats why it required a string as an input!
¶ 2.1.1. How to read
You may wonder about being unable to do much besides collapsing its title bar.
We’ll get to that, but there is some initial information we can gain from it.
By editing our first line and name it like any other object:
MyWindow = Ext.IMGUI.NewWindow("My ImGui Window")
Now we have an object called “MyWindow”, which we ccan dump with _D.
You may see some additional information pop up in the console already.
These are all components on our object, which we can read as well!
Using
_P(MyWindow.Label)
for instance, will print “My ImGui Window” since “Label” is a component our object.
If printing an object component ever throws an error it might be missing, if that happens, check with a dump if its even on your object!
¶ 2.2. What is possible?
To explore everything thats possible, let’s revisit our ExtIdeHelpers.lua file.
If you’re still in the same place as our last search, great! If not, search for “Ext_ClientImgui” again.
Last time, we discovered that we can utilize the Ext.IMGUI class with its function NewWindow(). But there’s more to it. If you look to the right, you’ll see:
:ImguiHandle
If you now search for this word instead you will find:
@Class ImguiHandle
This indicates that by using the function NewWindow(), we’re essentially creating a new object of the class “ImguiHandle”. As you look deeper into the file, you’ll notice that many functions make use of this class.
Continue scanning until you find a block of ImguiHandles underneath a class called ExtuiTreeParent:ExtuiStyledRenderable.
--- @class ExtuiTreeParent:ExtuiStyledRenderable
--- @field AddBulletText fun(self:ExtuiTreeParent, a1:string):ImguiHandle
--- @field AddButton fun(self:ExtuiTreeParent, a1:string):ImguiHandle
--- @field AddCheckbox fun(self:ExtuiTreeParent, a1:string, a2:boolean?):ImguiHandle
--- @field AddCollapsingHeader fun(self:ExtuiTreeParent, a1:string):ImguiHandle
--- @field AddColorEdit fun(self:ExtuiTreeParent, a1:string, a2:vec3?):ImguiHandle
--- @field AddColorPicker fun(self:ExtuiTreeParent, a1:string, a2:vec3?):ImguiHandle
--- @field AddCombo fun(self:ExtuiTreeParent, a1:string):ImguiHandle
--- @field AddDrag fun(self:ExtuiTreeParent, a1:string, a2:number?, a3:number?, a4:number?):ImguiHandle
--- @field AddDragInt fun(self:ExtuiTreeParent, a1:string, a2:int32?, a3:int32?, a4:int32?):ImguiHandle
--- @field AddDummy fun(self:ExtuiTreeParent, a1:number, a2:number):ImguiHandle
--- @field AddGroup fun(self:ExtuiTreeParent, a1:string):ImguiHandle
--- @field AddInputInt fun(self:ExtuiTreeParent, a1:string, a2:int32?):ImguiHandle
--- @field AddInputScalar fun(self:ExtuiTreeParent, a1:string, a2:number?):ImguiHandle
--- @field AddInputText fun(self:ExtuiTreeParent, a1:string, a2:string?):ImguiHandle
--- @field AddNewLine fun(self:ExtuiTreeParent):ImguiHandle
--- @field AddPopup fun(self:ExtuiTreeParent, a1:string):ImguiHandle
--- @field AddRadioButton fun(self:ExtuiTreeParent, a1:string, a2:boolean?):ImguiHandle
--- @field AddSeparator fun(self:ExtuiTreeParent):ImguiHandle
--- @field AddSeparatorText fun(self:ExtuiTreeParent, a1:string):ImguiHandle
--- @field AddSlider fun(self:ExtuiTreeParent, a1:string, a2:number?, a3:number?, a4:number?):ImguiHandle
--- @field AddSliderInt fun(self:ExtuiTreeParent, a1:string, a2:int32?, a3:int32?, a4:int32?):ImguiHandle
--- @field AddSpacing fun(self:ExtuiTreeParent):ImguiHandle
--- @field AddTabBar fun(self:ExtuiTreeParent, a1:string):ImguiHandle
--- @field AddTable fun(self:ExtuiTreeParent, a1:string, a2:uint32):ImguiHandle
--- @field AddText fun(self:ExtuiTreeParent, a1:string):ImguiHandle
--- @field AddTree fun(self:ExtuiTreeParent, a1:string):ImguiHandle
This block represents the class “ExtuiTreeParent” utilizing the “ExtuiStyledRenderable” class, which contains functions to create new objects of the ImguiHandle class.
Its essentially an object, making use of another object, to create a new object on itself. (“self”)
It is explained like this because this guide won’t cover everything, but it’s a starting point for you to navigate the ExtIdeHelpers.lua file and discover new features on your own. If you ever forget how a specific function works, you’ll know how to find it.
¶ 2.3. The basics
You created your first window, named it and now also have a list of things to add.
To start off, we begin by adding simple Text (Line 26 in the code block mentioned earlier).
For this to work, we need to tell the MyWindow object to use the AddText() function with a : in between them.
--Don't forget that AddText() requires a string as a parameter!
MyWindow:AddText("Hello World")
This should make your window have a text section which says “Hello World”
We can also make it in form of a button:
--AddButton() also requires a string
MyWindow:AddButton("Hello World")
This should make your window have a button which says “Hello World” on it.
Always check what type of parameter a function you want to use requires.
You may have done this by either editing the previous text to be a button or create a new line.
If you did the latter, you should notice that it is now listed underneath the previously created text as every new line you create gets added underneath the previous one. There are ways around this, which we will get into later.
Try out a few others but skip AddTabbar(), AddCollapsingHeader(), AddTree(), AddGroup() and AddTable() for now, as making use of these is slightly more advanced.
For some, you might see an error pop up in the ScriptExtender console.
If you’re uncertain how to debug these errors, refer to the “Debugging” section within the “Getting Started with Script Extender” Guide.
¶ 2.4. Advanced Components
¶ 2.4.1. Taking tabs on TabBars
TabBars are akin to the tabs you find in internet browsers like Chrome or Firefox. However, adding them to our own window requires specific steps.
To initiate multiple tabs, we first need to create a TabBar component.
We can do that by making our window use the AddTabBar() function.
MyWindow:AddTabBar()
This creates a designated area where tabs will be placed upon. If you’ve inserted this below the components we added earlier, it should also appear beneath them in your window.
To fix that, we need to reorder them to make this line be above the others (Changing the order of execution)
Since we need to add the tabs to the tabbar itself and now our window object, we now need to make our TabBar into a named object.
MyTabBar = MyWindow:AddTabBar()
Just like with our window, we can now add other components to the tabbar.
This will be a necessity whenever we want to do anything with a components we create on an object.
Because only now, we can add a TabItem to our TabBar!
How would one do this?
Its quite simple, instead of adding to our MyWindow object, we now want to add to our MyTabBar object.
MyTabBar:AddTabItem()
Remember to check what each function requires. AddTabItem() for instance requires a string so to actually have a name for our tab, lets do this:
MyTabBar:AddTabItem("My First Tab")
You now have a tab an can add more!
Simply repeat this line but with a different string parameter.
TabItems are a function only available to TabBars, please make sure you only use functions that are available to a given class. You can check whats available via the ExtIdeHelpers.lua file.
¶ How to work with multiple tabs:
Now that you’ve created your first TabItem(s), we need a way to decide upon which tab we are going to add more components to.
You might see a pattern here, but yes, we just make them into their own separate objects by given them a name.
MyTabOne = MyTabBar:AddTabItem("My First Tab")
MyTabTwo = MyTabBar:AddTabItem("My Second Tab")
Based on all we’ve talked about before, how to add to a specific tab, might slowly become obvious now.
If we want to add something to MyTabOne, we do so by typing
MyTabOne:SomeFunction()
If you want to add something to MyTabTwo, just use a function on MyTabTwo instead.
¶ 2.4.2. Hiding Content: Collapsing Headers
CollapsingHeaders offer a nice way to organize and hide/reveal content in ImGui.
To begin, we’ll need to introduce a CollapsingHeader into on of our objects.
Which one we add components to is now entirely up to you.
If you have looked at the documentation of the ExtIdeHelpers.lua file, you might also already know how to add one if you look at how the function was named.
Just like the other ones, we will start with an : ,type Add and then the component we want to add.
:		Add		CollapsableHeader
:AddCollapsableHeader()
Just like before, assigning it a name turns it into its own object, enabling you to add additional components to it. Consequently, any components added to the header will be under its control and will disappear when collapsed.
However, if you added components to the first tab, which were attached to the overall “MyWindow” object, you’d notice they won’t collapse. This is because they are associated with the window object and not the Collapsing Header. Conversely, if you added components to another tab, you could test this by adding additional components directly to the tab itself, resulting in a similar outcome.
Only components that are part of the CollapsableHeader hierarchy, will be hidden if you collapse it.
Components on other Objects will not be hidden.
¶ 2.4.3. Navigating through Trees
A tree is essentially like the directory sidebar you find within your file browser on your PC.
It has a root and from there a tree grows with different branches and leaves.
This is a simplified structure on what a tree can look like.
RootName
|->Tree 1
|->Tree 2
|->Tree 3
    |->Tree 3.1
    |->Tree 3.2
  	|->Tree 3.2.1
|->Tree 4
To create one, we need to decide where to add it. Whether to a tab or perhaps a Collapsing Header is entirely your choice. For explanation purposes, we will call it “parentObject”:
treeRoot = parentObject:AddTree("Name it whatever you want")
tree1 = treeRoot:AddTree("Tree 1")
tree2 = treeRoot:AddTree("Tree 2")
tree3 = treeRoot:AddTree("Tree 3")
tree4 = treeRoot:AddTree("Tree 4")

tree31 = tree3:AddTree("Tree 3.1")
tree32 = tree3:AddTree("Tree 3.2")

tree321 = tree32:AddTree("Tree 3.2.1")
¶ 2.4.4. Grouping Components
Groups are like regions we covered in the beginning, just that they don’t actually comment out code.
Instead they “Group” multiple objects together.
Normally in ImGui you’d use BeginGroup() and EndGroup(). With ScriptExtender however we only need to use :AddGroup() and give the group a name within its parameter so every object using it, will get grouped together.
If you look for it in the ExtIdeHelpers.lua file you will notice that there is nothing else you can do with it once you add it. Its simply there to add an identifier for ImGui to know which objects to group up correctly.
someButton = parentObject:AddButton()

someButton2 = parentObject:AddButton()
someButton2:AddGroup("MyGroup")
someButton3 = parentObject:AddButton()
someButton3:AddGroup("MyGroup")

someButton4 = parentObject:AddButton()
someButton4:AddGroup("MyOtherGroup")
¶ 2.4.5. Organizing and Managing Data with Tables
If you’ve worked with ScriptExtender before you might already use them in a way, here we are going to visualize them!
To create a table we do something else here because a table requires an additional parameter.
The additional parameter controls how much columns your table will have. So if you want your table to have 5 columns, you need to type:
myTable = parentObject:AddTable("Something", 5)
If you try updating your UI by reloading your save, you will notice there is nothing really there and you don’t see any rows or columns.
Thats because, for the rows at least, we have to add them seperately. Columns aren’t visible to us because we don’t have any data in them and/or didn’t style them yet.
Now that we have a table we can add a row:
tableRow1 = myTable:AddRow()
You need to do this for every new row you require, while also having to name each one if you want to add data to them.
We have a grid of rows and columns now.
If you’ve ever worked with a spreadsheet before, you may think that we can already go ahead and add data now, but thats only kind of right.
For ImGui, now that we have rows, we need to manually add cells before adding anything else.
Since these cells are only for us to add another component to, we don’t need to name them themselves.
Instead we can just combine it with some text or a button we want to add to the row.
myTableButton = tableRow1:AddCell():AddButton("Click me!")
myTableText = tableRow1:AddCell():AddText("Don't click me!")
Keep in mind that each cell we create, advances along the available columns. Meaning the first cell is within the first column, the second cell within the second column and so on.
If you do reach your maximum amount of columns, nothing stops you from creating more cells, they just won’t be visible.
Here you then want to create a new row, and populate this one instead.
¶ 2.5. Transition into ImGui Logic
Make yourself familiar with different UI structures you can build manually, because next we are going to talk about some logic you can add to buttons, checkboxes, etc.
This may include sudden jumps between the remaining parts because some stuff you can and might want to do will lead you to create links between the logic of a button itself and events you have to create to communicate with the server to even making a button that changes some styling options.
So take some time and try to create a rough outline on what you might want your mod too look like so you are getting accustomed to quickly creating new ImGui objects and their components.
Below are some additional resources.
¶ 3.0. Useful Resources
Norbyte
Norbytes search engine: https://bg3.norbyte.dev/
Script Extender: https://github.com/Norbyte/bg3se/tree/main
SE API Documentation: https://github.com/Norbyte/bg3se/blob/main/Docs/API.md
SE IDE Helpers: https://github.com/Norbyte/bg3se/blob/main/BG3Extender/IdeHelpers/ExtIdeHelpers.lua
LsLib: https://github.com/Norbyte/lslib
FallenStar
FallenStar’s VSCode extension: https://marketplace.visualstudio.com/items?itemName=FallenStar.bg3-se-snippets
LaughingLeader
BG3MM: https://github.com/LaughingLeader/BG3ModManager
Osi functions: https://github.com/LaughingLeader/BG3ModdingTools/blob/master/generated/Osi.lua
Osi Events: https://github.com/LaughingLeader/BG3ModdingTools/blob/master/generated/Osi.Events.lua
Larian Studios
Osiris: https://docs.larian.game/Osiris